How roof tiles stay attached in wind
A tile roof needs more than weight and overlapping rows to stay in place. We explain how approved attachment systems work, why roof caps need separate details, and what you should ask before installation.
By the USA Roofing team · · 5 min read

Tile weight is not the attachment system
A concrete barrel tile feels heavy in your hands. On a roof, though, weight alone is not enough to hold it in place against wind. Each tile needs an attachment method suited to the tile, the roof assembly and the wind demands at your house.
We often see homeowners focus on tile color and shape while the attachment details get little attention. Those details sit beneath the finished surface, but they deserve a clear explanation before work starts.
Tiles may be secured with approved roof tile foam adhesive, mechanical fasteners or an approved combination. The right choice is not simply whichever method a crew prefers. It must match the product approvals and the installation requirements for your particular roof.
Attachment and waterproofing also do different jobs. For that distinction, read about the waterproofing hidden beneath a tile roof. Here, the question is how the tiles themselves stay connected.
Foam adhesive depends on placement and contact
Roof tile foam adhesive is a purpose-made attachment material, not ordinary gap-filling foam. In an approved assembly, it bonds the tile to an approved surface beneath it. The tile, adhesive and receiving surface must be compatible with that assembly.
The installer places adhesive in the locations specified for the tile profile and attachment design. As the tile is seated, the adhesive must make the required contact with its underside and the surface below. A visible lump of foam beside a tile does not tell you whether that contact is correct.
Surface condition matters too. Dust, loose material or conditions outside the product's installation instructions can interfere with the bond. Application, tile placement and curing must follow those instructions, including any installer training requirements.
More foam is not automatically a better attachment. The approved placement and contact area matter. Adding an extra blob somewhere convenient does not establish that the tile has the attachment required for your roof.
Before installation, ask us to explain the approved adhesive arrangement and how it connects to the underlying assembly. You do not need to judge foam placement yourself from a ladder.
Mechanical fasteners need the right connection
Mechanical attachment uses specified nails, screws or other approved fastening components to connect the tiles to the supporting assembly. The tile's fastening locations and the material receiving the fastener are part of that detail.
A fastener is not correct just because its head is visible. Its material, length, placement and required penetration must match the approved installation. It also needs to be installed without damaging the tile.
On South Florida houses, we pay attention to what is actually underneath the roof covering. Deck conditions, approved battens where used, roof slope and tile profile can affect the attachment detail. A method suitable for a neighboring house is not automatically suitable for yours.
Some approved systems combine adhesive and mechanical fastening. That does not mean every foam-set tile needs an added screw, or that every mechanically attached tile needs foam. The approved design establishes where each component belongs.
If a tile moves, adding a fastener through an easy-to-reach spot is not a sound repair plan. We need to identify the existing system and determine how to restore its attachment without creating another problem.
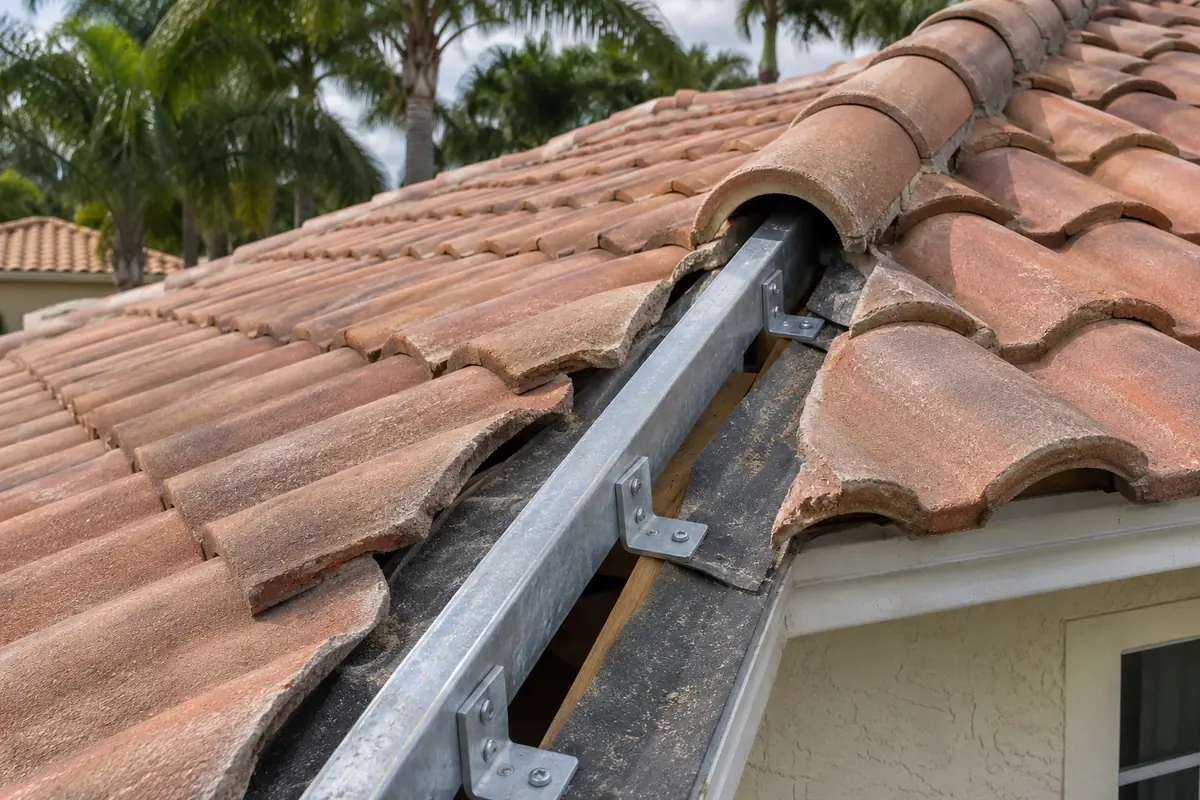
Hips and ridges need their own details
A hip is the sloping outside intersection where roof planes meet. A ridge is the upper intersection along the roof's peak. The cap tiles covering these intersections are not installed exactly like the field tiles across the broad roof slopes.
These caps sit in exposed locations and bridge a change in the roof's shape. Their support and attachment need specific attention. A neat-looking row of caps does not show whether the concealed connections are correct.
Depending on the approved assembly, the detail may include a wood or metal support, its attachment to the roof structure, and specified adhesive or mechanical fastening for the cap tiles. Connections at tile overlaps can also be part of the installation.
Weather blocking beneath the caps serves a separate purpose from structural attachment. A smooth mortar finish is not evidence by itself that the caps are properly secured. We check the required support and connections, not just the finished appearance.
When comparing proposals, ask how the contractor plans to secure the hips, ridges and their supports. An answer limited to the field tiles leaves an important part of the roof unexplained.
The approval must fit your roof and county
The High Velocity Hurricane Zone, or HVHZ, is Miami-Dade and Broward counties. Palm Beach County is outside the HVHZ but inside the wind-borne debris region. Being outside the HVHZ does not remove the need for an approved attachment design appropriate to the property.
Products used in the HVHZ carry a Miami-Dade Notice of Acceptance, or NOA, or a Florida Product Approval for the HVHZ. A Florida approval that excludes the HVHZ is not interchangeable with an approval allowing that use.
The approval is more than a cover sheet. Its installation details and limitations identify permitted uses. The tile, adhesive, underlayment and supporting components need to work together within the applicable approved assembly.
Wind demands also vary with the building and its surroundings. We handle the engineering and permit documents needed for the project rather than choosing an attachment pattern by appearance.
- Ask which tile and attachment approvals apply to your roof.
- Ask whether the specified assembly is approved for your county.
- Ask how the design addresses field tiles, roof edges, hips and ridges.
- Keep the approved documents with your roof records.
Inspection checks the work against the documents
The inspector checks installation against the approved documents and applicable requirements. Miami-Dade's roof inspection checklist includes adhesive contact area and location, fastener details, and hip and ridge supports. These are installation checks, not just a look at the completed tile pattern.
Inspection timing matters because later work can hide the attachment. We coordinate the required inspections with the building department and arrange access to the work that needs examination. Check with your building department about the inspection sequence for your project.
At USA Roofing, our own crews install the roof, and we handle permits, engineering and inspections. Ask us to walk you through the attachment approach before installation, then keep the permit closeout records with your approved roof documents.
To discuss your tile roof and its attachment, request a free roof estimate or call (954) 637-7029.